Keywording Images in Lightroom – Easier and More Helpful Than You Thought
If you asked me two years ago if I would rather keyword my images in Lightroom or photograph a family reunion of fifty in the mid-day sun, I am pretty certain I would have packed my camera bag and been out the door faster than you can say “CHEESE!” The reality is that going back through thousands of images and assigning appropriate keywords is a mundane task and, for most of us, not worth the effort.
However, if you start NOW you will still reap the benefits and likely save time searching for images in the long run. Two years after beginning to keyword my client images and I can find any image I need in less than a minute.
So what exactly are keywords and why are they helpful timesavers for me?
Adobe Lightroom is not only a powerful editing program, but is useful organizational system that can be as straightforward or as complex in its structure as you wish it to be. While I can easily search the metadata for lens information, dates, etc., by adding keywords to images I can also search based on client names, specific shooting locations, types of sessions, and more. I often search for past images when updating my website, blogging sessions, writing photographer articles, or entering photo features/contests. Multiple user assigned keywords can be added to each image to create a searchable “database” to find images.
Assigning keywords can be done in two ways: Either during the import process or after
I prefer to add keywords upon import, as it takes me just a minute. The import column on the right shows the keyword box. Keep in mind that when adding keywords at import, you must add them to the entire set of images you are adding. Lightroom will begin to remember keywords you have previously used, making it even easier to quickly add appropriate words.

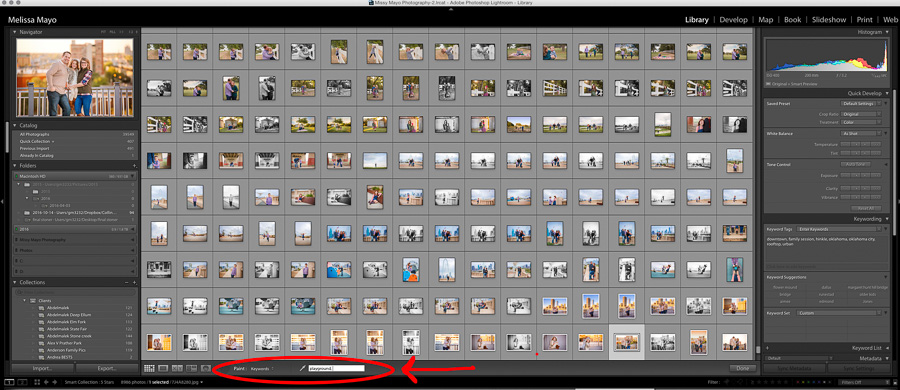
If I choose to add specific keywords to individual or small sets of images, I wait until after import. An easy way to do this is to use the spray can feature. Tap “G” for “grid view” and then locate the toolbar at the bottom corner. Simply type your chosen keywords and “spray” the images you want to keyword.

For my client images, I assign keywords based on the following:
· Name of City the session was shot at
· Specific name of location we used
· Any identifiable markers or features of the location (barn, lake, bridge, etc.)
· Type of Session (family, maternity, surprise engagement, etc)
· Last name of client
How do I search for images using keywords?
Good news – it’s easy! I tap “G” for “grid view” in the Library Panel. Then tap “\” to pull up the library filter bar (on top of your grid of images), which allows you to search for images based on set parameters. (For keyword searches click Text -> Keywords) For instance, if a client requests examples of lake locations for their upcoming family shoot then I simply search “family session” and “lake” to quickly pull up examples of previous work I have done. I also choose to search for just my 5 star images, as those are my final edits. I can then quickly export a few favorites and put them in a Blogstomp collage for my client.

Keywording doesn’t have to be a huge extra step in your workflow. Start adding keywords now to make your image catalog easier to navigate!
